jeffknits

Sunday, August 27, 2006


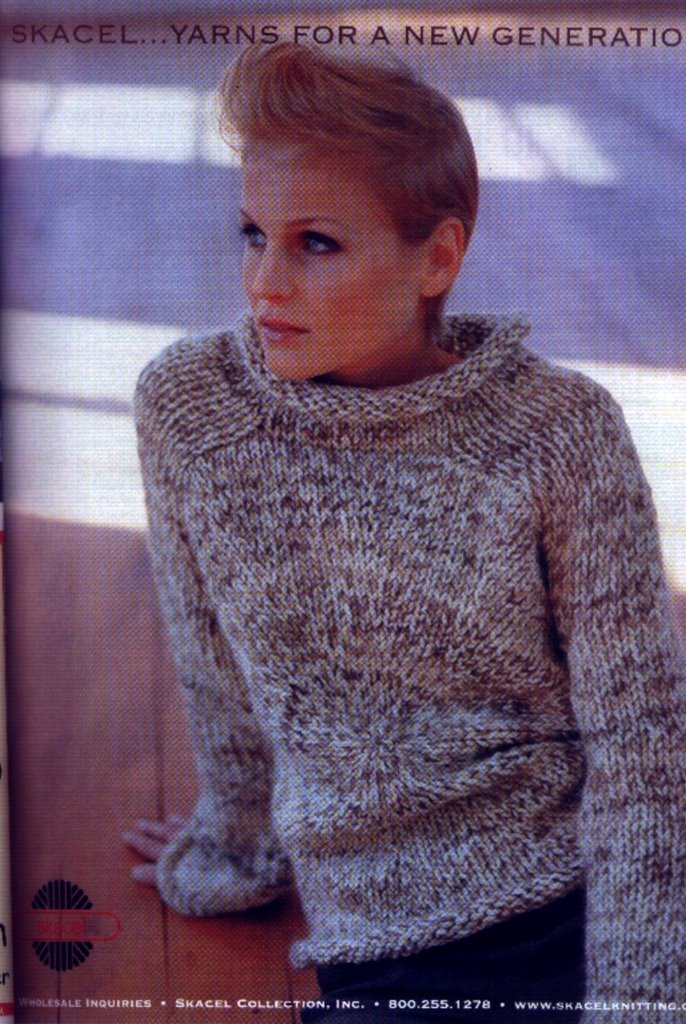
DISASTER: Schoeller-Stahl Excellent mouliné sweater

I saw the picture above in Interweave knits and was captivated by it. I went to our yarn store and bought the Schoeller-Stahl Winter 2003-2004 book that contains this pattern. The pattern is interesting in that it contains a circular front and back knitted on 10.75 double pointed needles. Apparently, this is an unusual size for dpns; fortunately, Brittany makes them and I was able to get them at our yarn store. I heard now that Crystal Palace is also carrying this size dpns.

The original pattern in the Schoeller-Stahl book is useless and should be avoided at all costs. The instructions were plain wrong and I actually had to frog my sweater a couple of times, thinking it was my error (see below). The way the instructions are written, the sweater is not turning out like the model in the picture. In frustration, I brought the pattern and my knitting to the yarn store for assistance. None of the teachers could figure out the pattern. The owner, who is a native of Germany, said that even the German instructions of the pattern do not make sense!


Finally, the owner decided to contact Skacel, who now owns the pattern for some reason. She was faxed over new instructions for the pattern that are unlike the original that is in the book. I have yet to go back and reknit the project using the Skacel instructions; it still boggles me how a company like Schoeller-Stahl could put out such a defective pattern. They should pay me for the cost of the book. The instructions from Skacel also specify easier to find size 10.5 or 11 dpns.

The lesson here is if any of you are taken in by the pattern while perusing a knitting magazine, DO NOT use the pattern in the original Schoeller-Stahl book. Have your yarn store contact Skacel to email or fax you the correct pattern.

Wednesday, August 23, 2006

Lace

Below is a picture of a lace shawl that I completed recently. Pattern is from Cheryl Oberle's magnificent book "Folk Shawls". This is the "Wool Peddler" shawl that is on the cover of the book. I used Mountain Colors' "Wool Crepe" yarn for this project. This is a yarn that consists of a nubby, springy strand wound around a straight strand. This gives the yarn a very springy quality and texture.

Knitting lace with this yarn was rather challenging. If I had to start all over, I would choose a plain fingering or dk yarn. Because of the yarn's nubby, springy quality, it was rather difficult for me to see the stitches and yarn-overs and align the motifs properly. The colors also made the whole project challenging. However, persistence paid off in a shawl that has a great drape to it; it just hangs off the shoulders when worn and the stitches stretch out all by themselves. As a result, I found it unnecessary to block the finished shawl. The shawl is quite big and I had trouble fitting it into my camera view finder as a result.

Below is a quick lacy project that came out of the summer 2006 issue of Knitter's. This is the "Morning Glory" capelet designed by Rick Mondragon. I changed the edging for the capelet; the original had little short-row triangles that made the capelet look like Kermit the Frog's cape. I changed it to a simple feather and fan edging. The body of the capelet is gorgeous though and the lace pattern is not difficult to do. I used an Interlacements yarn for this capelet.

As you may have noticed, I like intense colors in my projects. I hope the recipients of these projects would not object to the colors.

Last are a couple of rectangular shawls I am making. The first is the wonderful Victorian shawl from the cover of the same issue of Knitter's. I am using Karabella's "Lace Mohair" for this project.

The second is a feather and fan shawl from an Interlacements pattern, using one of their gorgeous hand-painted yarns. I am not sure when I will finish these two projects. I am knitting a cardigan for my other half and he has been urging me to finish that one first before finishing anything else because fall is fast approaching!

Tuesday, August 22, 2006

TAMS

Below are pictures of tams that I finished last year. Both are from Vogue Knitting on the Go's "Hats" book. This is a great series of knitting books. I really do not care for the magazine itself; most of the patterns in Vogue Knitting magazine are overly trendy (perhaps to compete with its more prestigious sister publication Vogue) and would go out of fashion before one could spell schädenfreude. However, the Vogue Knitting on the Go books are great and are highly recommended.

Below is the fair isle tam from the cover of the book. A wonderful pattern and very soothing to knit. I substituted the yarns because our knitting shop does not carry the specified Harrisville yarns. So I used a combination of Silja and another sock yarn. There is a mistake at the top of the tam when I got the white yarn mixed in with the turquoise yarn. I thought about doing a duplicate stitch to cover up my mistake. But then, I decided to leave the mistakes in because I do not believe that every knitting project must be 100% perfect.


Below is an intarsia tam from the same book. Also a fun project. I made a minor boo-boo as a result of not reading the pattern carefully. The pattern specifed a decrease towards the top every other row. I did my decrease every row. Not a major error; the sample in the shop has a more conical shape because of the slower decrease. Mine has more of a dome and traditional tam shape because of the faster decrease. I also knitted this project using the Silja sock yarns. Because of the Silja yarns, both tams can be thrown into a cold washer.

Monday, August 21, 2006

Dyeing adventure

I began knitting in November 2004. I haven't stopped since then, and I have knitted many things that I have given away as gifts. The reason for this blog is a way for me to document my knitting, before I send them off to friends and loved ones.

Recently, I began to think maybe I should dye my own yarn. I received a hank of yarn from www.wool2dye4.com along with a beautiful DK bluefaced leicester that I bought. The proprietress of wool2dye4, Sheila Mahone, is a wonderful woman who also enclosed a couple packages of Kool Aid and instructions on dyeing with Kool Aid along with my purchase.

This is a picture from my first attempt. The yarn, a wonderfully soft Kona superwash fingering weight, is being scoured by soaking in a bowl of warm water and a couple tiny squirts of dishwashing liquid. I did not use vinegar because Kool Aid already has acid in it. On other blogs and web sites, I have noticed people adding a few "glug-glugs" of vinegar to the scouring process to ensure better dyeing results when dyeing with Kool Aid.

Next, the yarn is being dyed. I mixed four ounces of water with one package of Kool Aid Jamaica (red) and four ounces of water with a package of Kool Aid mango (orange). To achieve the green avocado color, I simply mixed two ounces of the mango with two drops each of green and blue McCormick's food coloring.

Kool Aid works like an acid dye. The acid (I believe it's citric in this case) is already mixed in with the Kool Aid powder. The acid causes a reaction with the protein fiber when heated, thus allowing the dye to bond with the wool. All that one has to do is dissolve one package in 4 oz of water, dye the cleaned and dampened wool and heat to set the dye into the fiber. Once dyed, the wool is color-fast and does not fade at all. This is a surprise to me, considering that Kool Aid is something that one drinks. Please make sure to use the unsweetened variety of Kool Aids. Apparently, the sugared ones will cause your yarn to glop together hopelessly.


Below is a picture of the dyed yarn being placed in a microwave-safe bowl and covered with plastic wrap. I'm thinking next time I should not fold the yarn on top of itself like this. Following the instructions, I micowaved for 2 minutes, let rest for 2 minutes, and microwaved for another 2 minutes. One can also steam the yarn. Once cooled to room temperature, I very, very gently squeezed the water out of the yarn. The liquid that came out was slightly milky, meaning that all the dyes had been absorbed or "exhausted" by the yarn. No wasted dye!


Next, a picture of the yarn after drying. There are mistakes, being that this is my first attempt. For one, I didn't secure the hank of yarn carefully. So after drying, I noticed that a few strands of yarn that should have been dyed red were dyed green. Also, I did not use sufficient quantities of dye for this project, so I ended up with strands of undyed yarn. Next time, I will double the recipe.


Next is a picture of the yarn after I wound it up. Last is a 4" x 4 " swatch that I made. As you can see, the white strands of yarn did not hurt the swatch and in fact breaks up the intensity of the colors. I am currently knitting a pair of socks with the yarn. I will post the finished picture of the socks.