Dyeing adventure
I began knitting in November 2004. I haven't stopped since then, and I have knitted many things that I have given away as gifts. The reason for this blog is a way for me to document my knitting, before I send them off to friends and loved ones.
Recently, I began to think maybe I should dye my own yarn. I received a hank of yarn from www.wool2dye4.com along with a beautiful DK bluefaced leicester that I bought. The proprietress of wool2dye4, Sheila Mahone, is a wonderful woman who also enclosed a couple packages of Kool Aid and instructions on dyeing with Kool Aid along with my purchase.
 This is a picture from my first attempt. The yarn, a wonderfully soft Kona superwash fingering weight, is being scoured by soaking in a bowl of warm water and a couple tiny squirts of dishwashing liquid. I did not use vinegar because Kool Aid already has acid in it. On other blogs and web sites, I have noticed people adding a few "glug-glugs" of vinegar to the scouring process to ensure better dyeing results when dyeing with Kool Aid.
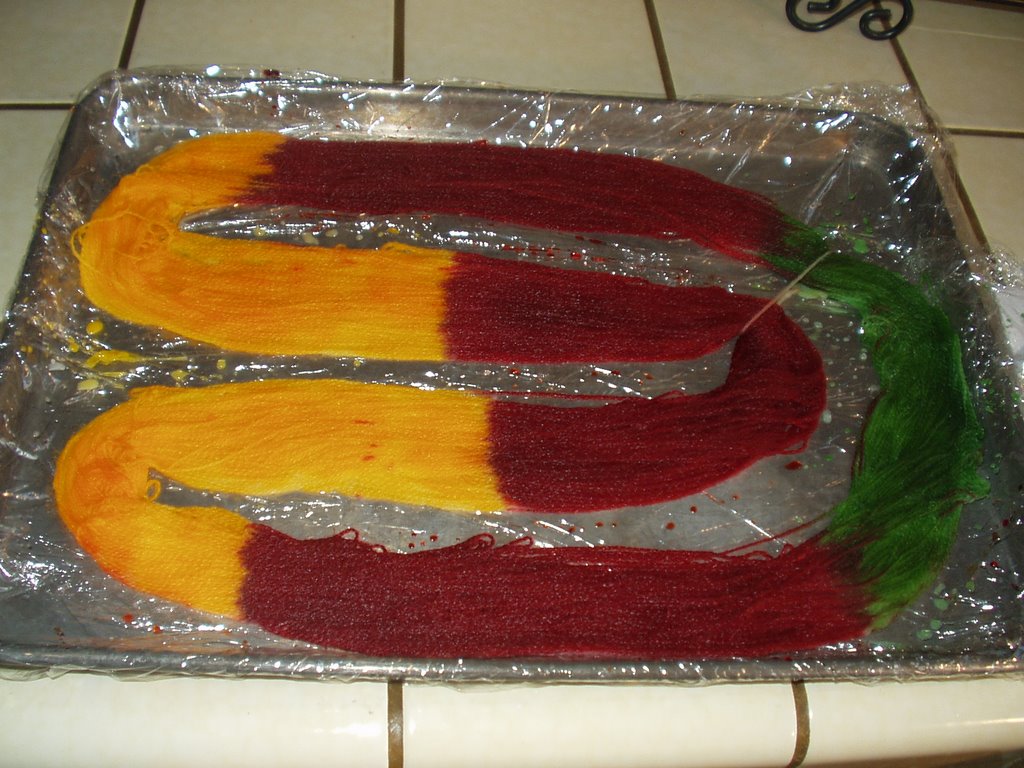
Next, the yarn is being dyed. I mixed four ounces of water with one package of Kool Aid Jamaica (red) and four ounces of water with a package of Kool Aid mango (orange). To achieve the green avocado color, I simply mixed two ounces of the mango with two drops each of green and blue McCormick's food coloring.
Kool Aid works like an acid dye. The acid (I believe it's citric in this case) is already mixed in with the Kool Aid powder. The acid causes a reaction with the protein fiber when heated, thus allowing the dye to bond with the wool. All that one has to do is dissolve one package in 4 oz of water, dye the cleaned and dampened wool and heat to set the dye into the fiber. Once dyed, the wool is color-fast and does not fade at all. This is a surprise to me, considering that Kool Aid is something that one drinks. Please make sure to use the unsweetened variety of Kool Aids. Apparently, the sugared ones will cause your yarn to glop together hopelessly.

Below is a picture of the dyed yarn being placed in a microwave-safe bowl and covered with plastic wrap. I'm thinking next time I should not fold the yarn on top of itself like this. Following the instructions, I micowaved for 2 minutes, let rest for 2 minutes, and microwaved for another 2 minutes. One can also steam the yarn. Once cooled to room temperature, I very, very gently squeezed the water out of the yarn. The liquid that came out was slightly milky, meaning that all the dyes had been absorbed or "exhausted" by the yarn. No wasted dye!

Next, a picture of the yarn after drying. There are mistakes, being that this is my first attempt. For one, I didn't secure the hank of yarn carefully. So after drying, I noticed that a few strands of yarn that should have been dyed red were dyed green. Also, I did not use sufficient quantities of dye for this project, so I ended up with strands of undyed yarn. Next time, I will double the recipe.

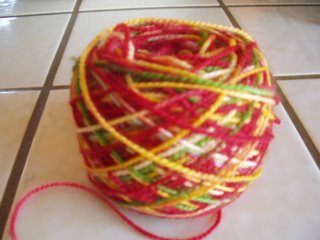
Next is a picture of the yarn after I wound it up. Last is a 4" x 4 " swatch that I made. As you can see, the white strands of yarn did not hurt the swatch and in fact breaks up the intensity of the colors. I am currently knitting a pair of socks with the yarn. I will post the finished picture of the socks.

Recently, I began to think maybe I should dye my own yarn. I received a hank of yarn from www.wool2dye4.com along with a beautiful DK bluefaced leicester that I bought. The proprietress of wool2dye4, Sheila Mahone, is a wonderful woman who also enclosed a couple packages of Kool Aid and instructions on dyeing with Kool Aid along with my purchase.
 This is a picture from my first attempt. The yarn, a wonderfully soft Kona superwash fingering weight, is being scoured by soaking in a bowl of warm water and a couple tiny squirts of dishwashing liquid. I did not use vinegar because Kool Aid already has acid in it. On other blogs and web sites, I have noticed people adding a few "glug-glugs" of vinegar to the scouring process to ensure better dyeing results when dyeing with Kool Aid.
Next, the yarn is being dyed. I mixed four ounces of water with one package of Kool Aid Jamaica (red) and four ounces of water with a package of Kool Aid mango (orange). To achieve the green avocado color, I simply mixed two ounces of the mango with two drops each of green and blue McCormick's food coloring.
Kool Aid works like an acid dye. The acid (I believe it's citric in this case) is already mixed in with the Kool Aid powder. The acid causes a reaction with the protein fiber when heated, thus allowing the dye to bond with the wool. All that one has to do is dissolve one package in 4 oz of water, dye the cleaned and dampened wool and heat to set the dye into the fiber. Once dyed, the wool is color-fast and does not fade at all. This is a surprise to me, considering that Kool Aid is something that one drinks. Please make sure to use the unsweetened variety of Kool Aids. Apparently, the sugared ones will cause your yarn to glop together hopelessly.
Below is a picture of the dyed yarn being placed in a microwave-safe bowl and covered with plastic wrap. I'm thinking next time I should not fold the yarn on top of itself like this. Following the instructions, I micowaved for 2 minutes, let rest for 2 minutes, and microwaved for another 2 minutes. One can also steam the yarn. Once cooled to room temperature, I very, very gently squeezed the water out of the yarn. The liquid that came out was slightly milky, meaning that all the dyes had been absorbed or "exhausted" by the yarn. No wasted dye!

Next, a picture of the yarn after drying. There are mistakes, being that this is my first attempt. For one, I didn't secure the hank of yarn carefully. So after drying, I noticed that a few strands of yarn that should have been dyed red were dyed green. Also, I did not use sufficient quantities of dye for this project, so I ended up with strands of undyed yarn. Next time, I will double the recipe.

Next is a picture of the yarn after I wound it up. Last is a 4" x 4 " swatch that I made. As you can see, the white strands of yarn did not hurt the swatch and in fact breaks up the intensity of the colors. I am currently knitting a pair of socks with the yarn. I will post the finished picture of the socks.


posted by Jeff @ 11:01 PM
![]()

2 Comments:
At 7:01 PM, Tallguy said…
Dyeing with KA is so much fun, you could do it all day long, and have hundreds of different skeins! The possibilities are endless!
You will find that the acid in the KA is rather weak, and you may get better results if you add a bit of vinegar or citric acid to the dye.
One correction: the amount of water you use doesn't matter. It is the amount of KA to the amount (weight) of fibre you are dyeing. If you are using the immersion method, then you would have used more water, but with the same number of packages, you would still get the same results. If you are painting the dye as you did here, then a more concentrated solution is easier to apply to get an intensity you like better.
Be sure that every strand is saturated with the dye; turn the hank over to get the other side, and push the dye all the way through. But little white bits are okay too! It's also interesting to see what happens when colours meet -- you will get a third colour. You may find that a cake pan would work better than a bowl as you used to nuke the skein -- less chance of colours running together. Or you can wrap the entire skein in plastic, like a sausage, and then heat it. I have used longer times -- up to 15 minutes -- but it gets very hot! I then let it cool several hours before opening the tube, and the dye sticks incredibly well!
I would like to see you try this again with much longer skeins; the colour effects are very nice that way! Remember also that knitting in the round will not look the same as knitting flat as you did here. Even knitting a wider piece will create new patterns. It's all so very exciting!
At 10:05 PM, Jeff said…
Thanks so much for the tip! I have already printed out your comments and saved them in my dyeing folder. I will definitely try the longer skein method next time.
Post a Comment
<< Home