jeffknits

Monday, October 23, 2006


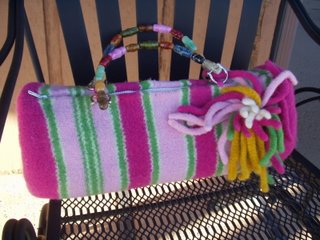
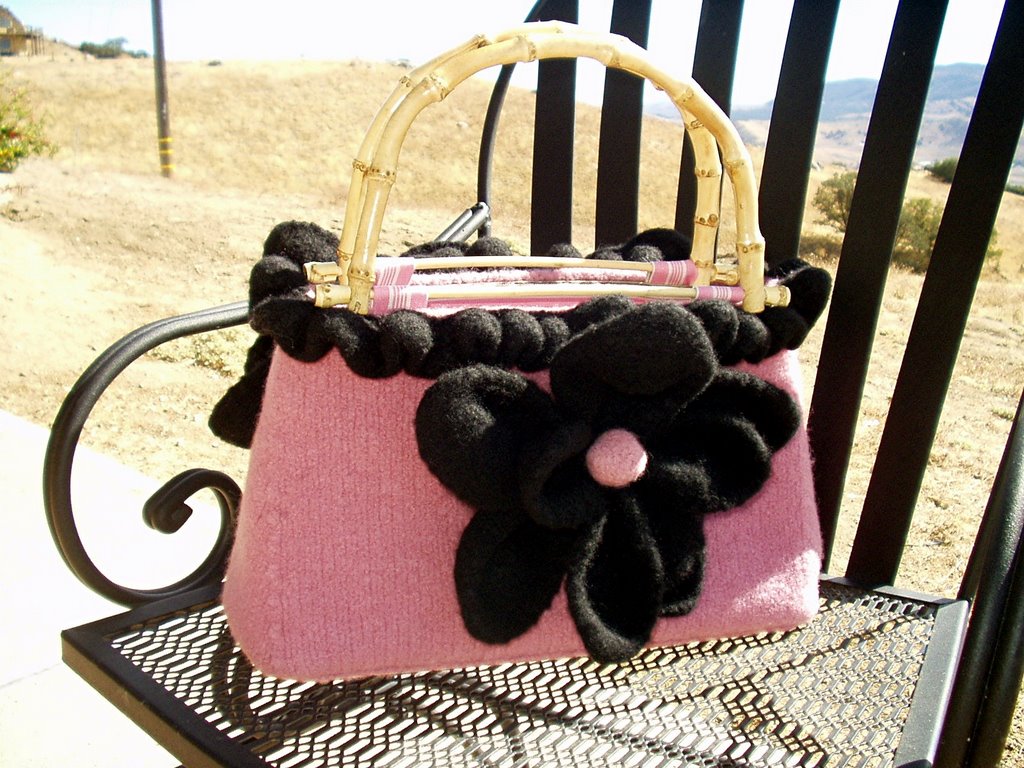
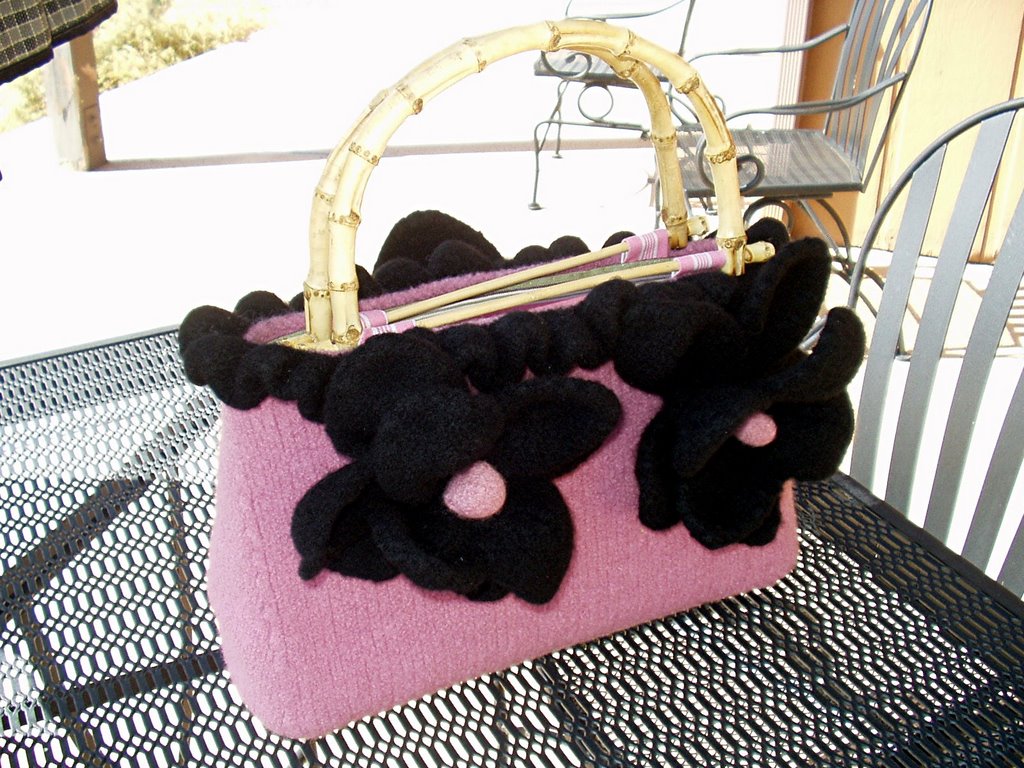
Finished: Noni pink and black bag

Following are pictures of the completed pink and black Noni bag with flowers attached and lining sewn in place.

What I really like about the Noni patterns is that they are sophisticated without taking themseves too seriously. There is a certain tongue-in-cheekness about the designs that I like. I've never been tempted to felt anything (much less bags) because a lot of the patterns are either too folksy (an ugly, slouchy, square bag) or too fancy (intarsia flowers, beading, embroidery, french knots (I hate french knots!), etc.).

With the Noni bags, one gets bags that are quick to knit, beautifully designed in terms of shape and proportions, and most of all, something that you would be proud to show to your friends instead of hide in the closet. Next up: the whimsical green and turquoise Majolica bag.

Finally, a picture of the two Noni bags so far in a naturalistic setting. I really need to take a photography class. All my photos are coming up too bright!
Second Noni bag: almost finished

Below are pictures of another Noni bag that I am making. This is the dusty pink and black bag from the "In the sculpture garden" leaflet. This is a fun bag to knit and the flowers are really pretty. I decided to make large flowers: 1 with 20 and 16 stitch petals and 2 with 16 and 14 stitch petals. I used leftover pink yarn from the body of the bag to make the bobbles.

I made the ruffles completely in black. The pattern calls for 3 skeins of pink and there should be enough to make the ruffles; somehow, maybe because of the way I knit, I almost ran out of pink yarn by the time I got to the top of the bag. Thus, I decided to make the ruffles in black, which do not affect the overall look of the bag in a negative way.

This bag is lined with the same fabric as my first bag (I'm not being cheap, just frugal!), which I fused to a layer of fast2fuse stiff interfacing. To make the liner even stiffer, I also stitched on a third layer of another stiff interfacing called Peltex by Pellon. Thus, the bag is nice and rigid and can stand upright all by itself.

I attached the Rowan bamboo handles to the lining using strips of the lining fabric that I folded to show only the pink. All the bag needs now is for the lining to be sewn in place, the flowers stitched on, and some sort of closure attached (maybe magnetic). I may just leave it without the magnetic closure because the bamboo handles do keep the bag pretty secure on top.

I am really happy with the way this project turned out. I showed the bag to the ladies at work and everybody wanted one. Thank you Nora!


Interior lining: pretty good job because I hate sewing. I cut out rectangular interfacings and fabric for the body and triangular interfacings and fabric pieces for the sides. After ironing on the fabric to the fusible interfacing, I glued (yes glued!) the three pieces together using sewing glue.
Pre-felted flowers

Felted flowers. Gorgeous!

Monday, October 09, 2006


Don's cardigan

Finished Don's Jo Sharp "Naples" cardigan. He loves it, which is the most important thing. He loves wearing it around town and showing off the cardigan. I had a great time knitting it, although the finishing was tricky because of all the stripes that need to be matched. I will be knitting him the men's sweater from Elsebeht Lavold's "Book Four" next.
Finishing the Noni

The finished Noni baguette. How cute and adorable!

Below are pictures of the Noni baguette being finished. I followed the author's advice on her website and used plastic needlework canvas to give the bag its stiff shape. Next time, I will use Timtex or Fast2fuse, both very stiff interfacings and are designed for lining bags, making stiff fabric bowls, hat brims, etc . Below, I taped two needlework canvases together because I could not find one large enough.

I taped the one-sided fusible to the canvas and ironed on my lining on the fusible side. No sewing! I can't sew very well; just enough to get me by. I did the same thing to the round ends. I sewed the round ends to the rectangle and eased the whole thing into the bag.

Next came the zipper, which is tricky because one had to carefully match the stripes. I attached the flowers prior to lining and sewing the zipper. I also tacked the flower petals to the bag to spread them out a little.

Last a picture of the lined interior. Pretty good job, considering my sewing skills.

I love this project and the Noni bags and I'm working on another Noni right now. Thanks Nora for the wonderful designs!

Tuesday, October 03, 2006

NONI BAG PINK, GREEN AND CREAM

I've decided to join the fray and start felting. I decided on the Noni cute and "sassy" baguette bag with chrysanthemum flowers made with Cascade 220 wool yarns using pale pink, bright pink, cream and green. I thought it was a garish combination, but my other half convinced me otherwise. He said it would be cute for one of our girlfriends to wear in the spring. This bag, along with an in-progress Lily Chin mosaic tunic, will be her birthday gifts in January.

Below are preliminary pictures of the project in progress. Looks like a ginormous striped watermelon. The pattern has a weird way of picking up stitches to do the round ends. I tried and could not figure out the instructions which call for picking up stitches from the wrong side, and then knitting clockwise. I tried to do this, but it was an impossibility; I ended up with reverse stockinette on the right side. Alas, I decided to pick up stitches from the right side like I normally do and managed to finish the round ends with no problem.

Also, there is a mistake in the pattern for the flexible bind-off method. It should say insert needle purlwise through two stitches from right to left; instead, the pattern said to insert knitwise. This is wrong. For reference on this technique, look up Elizabeth Zimmermann's "Knitting without tears" which has detailed instructions and diagrams of the method on page 23.


Below is a picture of the felted project. Bev Galeskas, in her book "Felted Knits" warned against letting a felted project go through the spin cycle. Thus, even though the pattern said to do this, I decided to skip this part. I am lucky to have a front loading Maytag Neptune washer with automatic water level sensor and the ability to be stopped so that I could check the felting process.

I got the dimensions called for in the pattern after repeating the agitating process three times. I used a linen wash by Yves Delorme (a minuscule amount) and simply rinsed the project under cold runnning water after felting was completed.

Surprise! Surprise! I have no conception of size whatsoever. The pattern said the project would measure 16" in length by 19" diameter. I got these measurements, but was quite shocked at how big this actually turned out to be. Oh well! I'm sure this will not be a problem; at least, I hope so.

I used t-pins to shut the project together for drying and placed two Polish china plates to maintain the round ends. I still need to sew on a zipper, attach bamboo handles, knit and felt the flowers and line the bag. I won't get these done until next week when I'll be making another trip to our LYS to get the supplies.